Applies to: Free and Pro · Last updated: October 21, 2026
This is the complete Quick Start. It takes you from your invite email to a published profile, your first fit check and your first week, in one page. Read the first two sections in about ten minutes, then keep the page open while you build. Each step links to the guide that covers its screen in full.
The guide is written for a new Free account, because everything up to publishing works the same on every plan. Where Pro is different, a line starting On Pro says so. Free is not a trial: the whole profile builder, résumé import, publishing, your public profile with its AI chat and Honest Fit Assessment, Check a Job Fit, AI Activity, recruiter messages and Refer & Earn all work on Free. Free vs Pro — what’s included, what the limits are compares the plans.
What’s on this page: how Profiled works · what to have ready · Step 1, accept your invite · Step 2, your dashboard · Step 3, choose how to build · Step 4, upload a résumé or profile document · Step 5, the nine tabs · Step 6, fill it with help · Step 7, your quality score · Step 8, publish · Step 9, Check a Job Fit · Step 10, your first week · Step 11, Refer & Earn and Gift Pro · Step 12, what Pro adds · Get Help · common questions.
Three companion guides go deeper on parts of this journey: Building your profile, Your first week on Profiled: build, publish, watch, fix and Earn Pro, gift Pro, practice and get help. Stuck at any point? Troubleshooting and first-week FAQ covers the common problems, symptom by symptom.
How Profiled works
Profiled builds career profiles recruiters investigate, not scan. (An ATS, or applicant tracking system, is the software most companies use to rank and sort résumés.) Instead of sending your résumé into an applicant-tracking black hole, you build one rich profile, and hiring managers come to investigate you.
A visitor to your profile can do two things with its AI:
- Ask it questions about you, through the Ask AI About Me button. The chat answers from your public profile only.
- Run an Honest Fit Assessment. They paste a job description and get a verdict: "Strong fit," "Worth a conversation," or "Probably not your person." The assessment is deliberately built not to flatter. It names your gaps out loud, because a profile that admits real gaps reads as credible rather than curated.
That sounds risky until you see why it works: depth can’t be faked. Why you left a role, what you actually shipped, what you would do differently and where you are genuinely weak go into private fields that visitors never see. The Honest Fit Assessment draws on all of it when it weighs your fit for a role, and that is what makes its verdict specific. A thin profile produces a thin verdict. A deep one is unmistakable.
You can run the same assessment on yourself. Check a Job Fit in your dashboard runs it against any job you are considering, even before you publish (Step 9).
What to have ready
- A résumé or a profile document as PDF, Word (.docx), Markdown (.md) or plain text (.txt), within the limits. Writing in Google Docs? Use File → Download → Microsoft Word (.docx). It is optional, but it fills in your basics, roles and skills, and you review every item first (Step 4).
- A profile photo if you would like one. It appears above your name on your public profile.
- Time. Allow 30–45 minutes for a first profile you can publish, and about another hour for the private depth that makes your fit verdicts specific. Your work saves as you go, so you can split it across sittings.
- On Pro: a working microphone for practice interviews (Step 10).
The honesty principle, up front
Profiled rewards candor. The forms keep asking for honest, private reflection: why you left a role, what you would do differently, where you have gaps. Publishing your gaps is a requirement, not a confession. Profiled will not let you publish until you have acknowledged at least one genuine gap, because a profile with no admitted weaknesses reads as inexperienced or dishonest, and the AI can’t be honest about gaps it doesn’t know about. How honest should I be about gaps — doesn’t that hurt me? makes the case in full.
What stays private
Anything marked Private in the builder is never shown to visitors and is never given to the visitor chat at all. Your private context is used by the Honest Fit Assessment. The profile assistant also reads it while it helps you write it, and shows it only to you. The private fields are the eleven reflection fields on each role, the honest notes on each skill, and the whole Values tab. Is My Private Context Ever Shown to Recruiters or Visitors? explains where each piece goes, and Privacy, your data, and account deletion covers your data rights.
Step 1 — Accept your invite
Profiled is invite-only during the closed beta. Your access starts with an email.

Find the email. Check your inbox, and your spam folder, for an email from Profiled. The subject depends on how you were invited:
| How you were invited | Subject line |
|---|---|
| A Free beta place | "You’re invited to Profiled" |
| A Pro beta place | "Your Profiled beta place is ready" |
| A friend, through Refer & Earn | It names your friend: "[name] invited you to Profiled" |
A beta invitation link is good for 14 days. The email says so: "This invite link is good for 14 days." An invitation from a friend through Refer & Earn is good for 90 days. If it has lapsed, ask whoever invited you to send a new one. How do I accept my invite and create my account? covers what to do in that case.
Click the button to open the sign-up page.
Answer two questions and tick one box. The page opens with two drop-down questions, both required, each starting on "Select one…":
- "How did you hear about Profiled?" Choose LinkedIn, A friend or colleague, Search engine, An event or talk, A newsletter, or Somewhere else.
- "Which describes you best?" Choose "Experienced — 5+ years in my field" or "Early career, or switching fields".
Below them is one checkbox: "I am 18 or older, and I agree to the Terms of Service and Privacy Policy." Both documents are linked from that line and open in a new tab. Until all three are done, the account form stays hidden and the page reads "Answer the two questions and tick the box above to continue creating your account."
Create your account. Set a password and complete any verification step shown, then submit. You land on your dashboard.
There is no public sign-up during the beta. Anyone who opens the sign-up page without an invitation link is sent to the priority list page instead, headed "We’re in closed beta." How do I get an invite to the beta? explains that route. Your profile starts as a draft, and nothing is public until you publish it.
Step 2 — Your dashboard
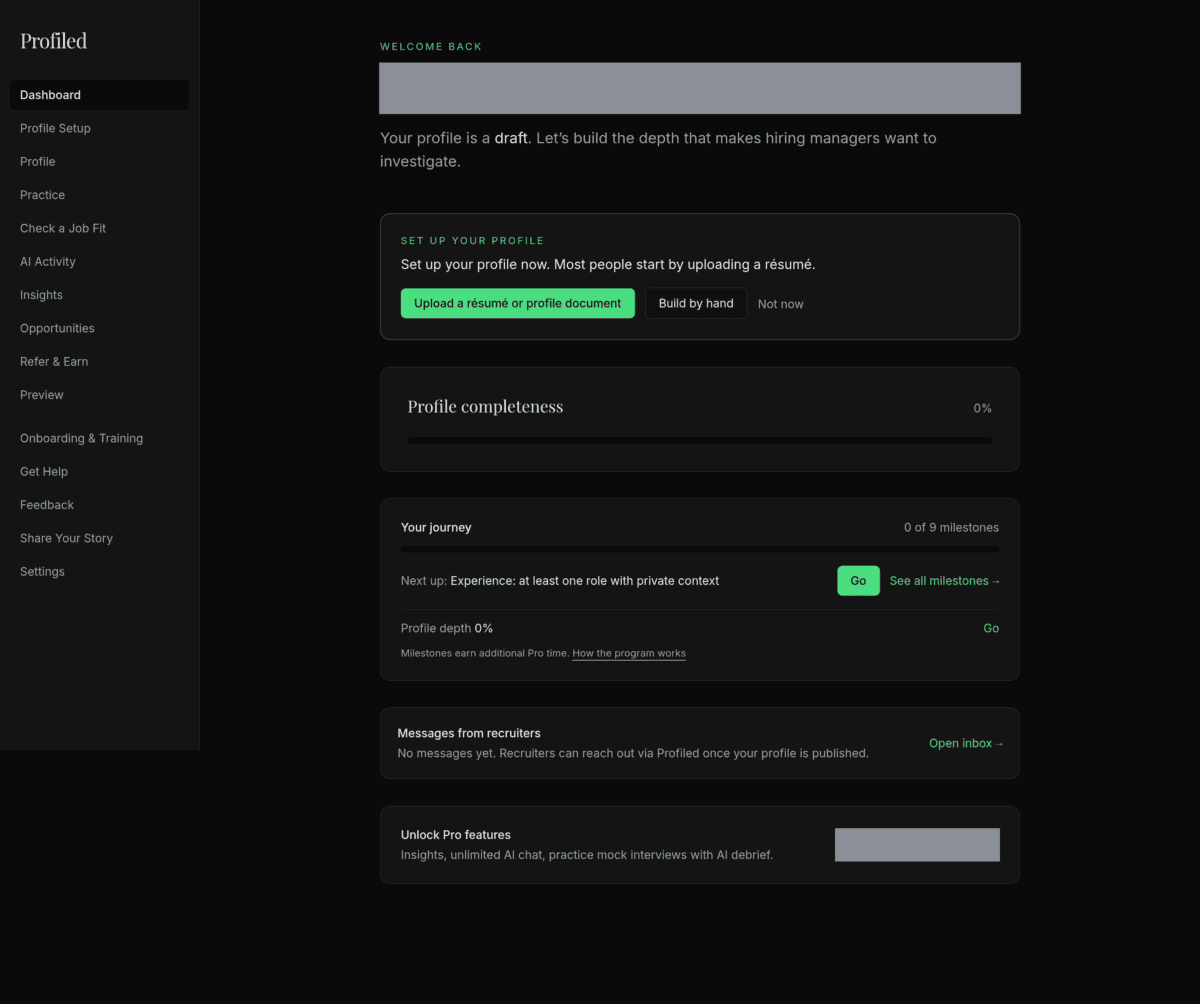
The dashboard is a status board: you read it, but you write nothing on it. From the top:
- The welcome header. A small "Welcome back" label, then your name. Until you enter your full name on the Basics tab, the first part of your email address stands in for it. Below that is your status. While you are a draft it reads "Your profile is a draft. Let’s build the depth that makes hiring managers want to investigate." Once you publish, it reads "Your profile is published — hiring managers can find and query it."
- Profile Setup. A panel headed "Set up your profile" that shows one next step at a time. On a Pro account, the Profile Setup panel on your dashboard also offers "Talk it out (experimental)", which opens the voice interview. On a new account it reads "Set up your profile now. Most people start by uploading a résumé.", with Upload a résumé or profile document and Build by hand (Step 3). Later it lists what publishing still needs. Not now folds it into a one-line bar; click Set up your profile on that bar to reopen it (Open while your profile is published). While your profile is published, the panel is headed "Profile depth". Profile Setup: the dashboard panel that gets you to publish covers every step.
- The Profile completeness card. Your quality score as a percentage, with a progress bar.
- Messages from recruiters. Your inbox. Until you publish it reads "No messages yet. Recruiters can reach out via Profiled once your profile is published." Recruiter accounts are not open during the beta, so expect this card to stay empty for now. Can recruiters contact me, and where do their messages arrive? explains how messages will work.
- On Free: a card offering Pro, listing "Insights, unlimited AI chat, practice mock interviews with AI debrief." Its upgrade button opens Settings. You can ignore it: everything you need to publish works on Free.
- With complimentary Pro: a "Complimentary Pro" banner at the top: "You have complimentary Pro access until [date]." It counts down the days and has a See plans button.
The account menu. On every Profiled page, your account picture in the top-right corner opens a menu with three items: Dashboard, which brings you back to this screen, Manage account and Sign out.
Dashboard: completeness, build paths, recruiter messages and banners describes every card and banner.
The sidebar

The sidebar is your map. In order:
- Dashboard. The home screen above.
- Profile Setup. The way back to the setup panel on your dashboard. It stays in the menu until your first publish.
- Profile. The Profile Builder, where you will spend most of your time.
- Practice. Mock interviews by voice with an AI interviewer that reads your public profile, followed by a written debrief. On Free, the page explains the feature and offers an upgrade. On Pro, you run sessions here (Step 10).
- Check a Job Fit. Run the Honest Fit Assessment on your own profile against a job you are considering (Step 9). Every plan.
- AI Activity. Every question visitors have asked your profile’s AI, the answer it gave, and the most recent fit assessments run against your profile, including your own checks. Every plan.
- Insights. Patterns across that activity. On Free it shows activity counts and an upgrade card. On Pro it shows the patterns.
- Opportunities. A hand-curated list of roles, fellowships and programs. It appears only when the Profiled team has switched it on for your account. Browsing is open on every plan; applying is a Pro action.
- Inbox. Messages from recruiters. It appears once the first message arrives.
- Refer & Earn. Invite people and earn months of Pro (Step 11). Every plan.
- Gift Pro. On Pro only: give people a 14-day Pro trial.
- Preview. A private preview of your draft that only you can see. Once your profile is published and public, this item changes to View your profile and opens your live page in a new tab.
- The footer group: Onboarding & Training, Get Help (the support hub), Feedback, Share Your Story, and Settings for your plan, billing and your data.
- On Pro: a Voice minutes widget at the bottom shows how many minutes you have left this month.
Your menu may show fewer items than this. Some depend on your plan and some appear only while the Profiled team has them switched on. Your User Dashboard at a glance: the menu, tiers, flags and banners explains why, and A menu item is missing from my sidebar covers the common cases.
Step 3 — Choose how to build
There are three ways in, and you can mix them:
| Way in | Where | Plan |
|---|---|---|
| Upload a résumé or profile document, then review it (Step 4) | Profile Setup, or "Import from résumé" on the Basics tab | Every plan |
| Fill it with help, the profile assistant (Step 6) | The Profile page, above the tabs | Every plan up to publish-ready; the full interview is Pro |
| Build by hand (Step 5) | Profile Setup, or Profile in the sidebar | Every plan |
Building by hand is the right route when your résumé is badly out of date, or when the roles you want to talk about are not the ones on it. The recommended path: upload your résumé first and review it, then add the private depth, with help or tab by tab. Should I import my résumé or build my profile by hand? weighs the options.
Step 4 — Upload a résumé or profile document

Upload a résumé or profile document in Profile Setup, or Import from résumé on the Basics tab, opens the importer, headed "Import from Résumé".
- Upload a PDF, Word (.docx), Markdown (.md) or plain-text (.txt) file. The file size, PDF length and number of uploads are on the limits page.
- Wait. Reading takes a few minutes, and you can leave the page: Profile Setup then shows "A file you uploaded is waiting for review." with Review it.
- Review. "Review your import" lists each proposed change with a tick box, a badge saying where it goes ("Public", "Fit assessment only" or "Steers Ask-AI chat") and its Before and After. Incomplete roles that match none of yours are listed under "Add these roles by hand", and education and certifications under "Not saved"; there is nothing to tick in those two lists.
- Apply. Untick what you don’t want, and tick anything you want that starts unticked: a change that replaces something already on your profile, and every AI instruction, starts unticked. Then click Apply to profile. Nothing changes before that.
A résumé fills your basics, roles and skills; the private context publishing needs is yours to add (Steps 5 and 6). The profile document template, linked on the upload step, has room for all of it. If you upload a profile document, its private section is read once to file it into your private fields; you see every item, marked "Fit assessment only", and nothing is saved until you apply it. A skill the import reads as one you are still developing shows as "Still developing" and lands in the Skills tab’s "Still developing" column, and The résumé import created too many or wrong skills… what do I do? walks through the cleanup. Importing again later proposes only what changed, and clears nothing. Importing a résumé or profile document: upload, review, apply covers every screen.
Step 5 — Build your profile, tab by tab
Open Profile in the sidebar. The page is headed "Profile Builder", and it has nine tabs, in this order:
Basics → Narrative → Experience → Skills → Gaps → Values → FAQ → AI Instructions → Portfolio
A button at the bottom of each tab except Portfolio opens the next one, for example "Continue to Narrative →". The active tab is part of the page address, so you can bookmark where you left off. Above the tabs sit your score bar, the Draft or Published status, the Publishing checklist toggle and the Publish profile button, and below them the Fill it with help panel (Step 6). Profile: the Profile Builder screen (score bar, status bar, checklist, tabs, saving) labels each part.
How saving works (read this once)
There is no Save button on ordinary fields. A small "Saving…" label appears beside a field and turns into "Saved".
- Basics, Narrative and Skills save about a second and a half after you stop typing, and again when you click or tab out of a field. Switching tabs or leaving the page also saves anything pending.
- Experience, Gaps, Values, FAQ, AI Instructions and Portfolio save a text field only when you click or tab out of it. Checkboxes and the drop-downs on these cards save at once.
The habit worth building: after your last edit, click an empty part of the page and wait for "Saved" before you close the browser tab. If a field shows "Save failed", your text is still in the box; reload in another browser tab to see what was stored before you retype anything. My last edit disappeared after I closed the tab. explains the one case where an edit can be lost.
5.1 — Basics: who you are
The tab is headed "Who you are, what you’re looking for". At the top are your profile photo, if the control is on your tab, and your Public profile URL. Below them are four sections.
- Identity. Full name, with the hint "Appears at the top of your public profile.", and Current title. Your full name is required to publish.
- Targeting. Target titles, the roles you want next, comma-separated. Its hint reads "Comma-separated. A private note for yourself — visitors, recruiters and the AI don’t see it." Remote preference (Not specified, Remote only, Hybrid, Onsite, Flexible), Availability (Not specified, Actively looking, Open to opportunities, Not looking) and Available from, a date.
- Compensation. Minimum, Maximum and Currency (USD, EUR, GBP or AUD). Your salary range is never shown publicly.
- Links & location. Location, and your LinkedIn URL, GitHub URL and Website URL, which appear as links on your public profile.
Set your availability and remote preference. Together they form the status badge at the top of your public profile, such as "Open to opportunities · Remote only". If both are left at "Not specified", no badge is shown. Availability is free on every plan.
Points: 10, from Full name, Current title and Location. Publishing: your full name. Every field is described in Tab 1 — Basics; your address is covered in Why doesn’t my profile URL match my name, and can I change it?, and the photo in How do I add or change my profile photo?.
5.2 — Narrative: your story
Headed "Tell your story". Seven free-text fields, all public, and the AI reads every one:
| Field | The prompt under it |
|---|---|
| Elevator pitch | "2-3 sentences. What do you want people to know in 10 seconds?" |
| Career narrative | "The arc of your career — where you started, key inflection points, where you’re heading." |
| Known for | "What would a former colleague say you’re best at?" |
| Looking for | "What does your ideal next role look like?" |
| Not looking for | "What should recruiters NOT contact you about?" |
| Management style | "How do you lead (or prefer to be led)?" |
| Work style | "How you get your best work done — tools, hours, environment." |
The elevator pitch is the one that counts. It must reach 100 characters to publish, and it carries all 20 of this tab’s points. A counter under it reads "N / 100 to publish" until you get there.
Early in your career, or changing fields? Use the narrative to frame the move honestly. "I came into UX from teaching through a bootcamp; here is what transferred and what I am still building" reads far stronger than padding. Every field is covered in Tab 2 — Narrative.
5.3 — Experience: public role, private depth
Headed "Your career story, role by role". Click + Add experience, or open a role the importer created. Each role has two halves.
The public half, "Role details": Company name, Job title, Title progression (for example "Junior → Senior → Staff"), Start date, End date or the I currently work here checkbox, and Key accomplishments, the public bullet points. Click + Add bullet point for each one.
The private half, eleven reflection fields. An amber banner above them begins "Private — never shown to visitors, and never given to your profile’s visitor chat at all. This context powers your Honest Fit Assessment". The fields are Why you joined, Why you left, Actual contributions, Proudest achievement, Would do differently, Challenges faced, Lessons learned, What your manager would say, What your reports would say, Conflicts & tensions, and Quantified impact. All are optional, and each one makes your fit verdicts sharper.
Publishing: at least one role needs a company name, a job title and two or more private fields filled. Points: 25, the largest share; a role counts once it has a company name, a job title and one private field, and three such roles earn the full 25. A role with strong public bullets and no private notes earns nothing.
Where to start: your most relevant recent role. Fill in why you left, what you would do differently and your quantified impact. Early in your career? An internship or a bootcamp project described with honest depth beats five shallow lines. What Do The 11 Private Experience Fields Do, and Who Sees Them? explains each field, and Tab 3 — Experience covers the tab.
5.4 — Skills: three honest columns
Headed "What you bring to the table". Three columns: Strong ("Core competencies with supporting evidence"), Moderate ("Skills you have but aren’t primary") and Still developing ("Skills you’re still building — honesty is strength"). Click + Add skill in a column. Each card has a Skill name, a Category that moves the card between columns, Years experience, Last used, Evidence ("What proves you have this skill?") and Honest notes, a private self-assessment that informs your fit assessments and never the visitor chat.
Publishing: at least 3 Strong skills and 1 skill marked "Still developing". After an import, that still-developing skill is the step people miss most often. A still-developing skill is one you are still building or want to grow in; it is separate from the Gaps tab, which comes next. Points: 15, from your Strong skills plus a bonus once a still-developing skill exists. Moderate skills do not score. See What is a "still developing" skill, and why does Profiled require at least one? and Tab 4 — Skills.
5.5 — Gaps: where you’re not a fit
Headed "Where you’re not a fit". Click + Add gap or weakness. Each entry has a Description, a Gap type (Not specified, Skill gap, Experience gap, Environment mismatch, Role type mismatch), "Why it’s a gap", and an Interested in learning this checkbox. Gaps are shown on your public profile.
Publishing: at least one entry. Points: 10 for two or more entries, 5 for one. Every field is in Tab 5 — Gaps.
5.6 — Values: entirely private
Headed "What matters to you". Everything on this tab is private: it informs your Honest Fit Assessment, and the profile assistant also reads it while it helps you write it, showing it only to you. Must-haves and Dealbreakers, each comma-separated, then five "how you work" reflections: Management style preferences, Team size preference, Conflict handling, Ambiguity tolerance and Failure handling. Points: 10. It blocks nothing, and it is worth about ten minutes. See Tab 6 — Values.
5.7 — FAQ: pre-written answers
Headed "Pre-written answers". Click + Add question. Each entry has a Question, an Answer and a Common interview question checkbox. Complete FAQs appear on your public profile, and the AI references them, so pre-writing your hardest answers lets it field them consistently. A question without an answer stays hidden. Points: 5. See Tab 7 — FAQ.
5.8 — AI Instructions: steering the chat
Headed "Guide the AI’s behavior". Click + Add instruction and choose a Type: Honesty directive, Tone directive, Boundaries or Custom. Then write the instruction, for example "If asked about management experience, be clear I’ve led projects but not direct reports." Instructions shape the visitor chat on your public profile. They are not given to the fit assessment, so an instruction cannot change a fit verdict. Points: 5 for at least one. See Tab 8 — AI Instructions.
5.9 — Portfolio: links to your work
Headed "Show your work". Click + Add item; each has a Title, a Type (GitHub, Blog post, Case study, Publication, Presentation, Project, Certification or Other), a URL and a Description. Portfolio items are stored for now: they are not shown on your public profile, not read by the AI and not scored. If you are still working toward publishing, spend the time elsewhere. See Tab 9 — Portfolio.
What are the nine profile tabs, and do I have to fill them all? sums up every tab, who sees it and what it scores.
Step 6 — Fill it with help
Writing about yourself is hard, so the Profile page has an assistant that asks the questions and drafts the answers for you to check. Open it with Fill it with help, between the publish controls and the tabs (it reads Continue with help once your profile can be published).
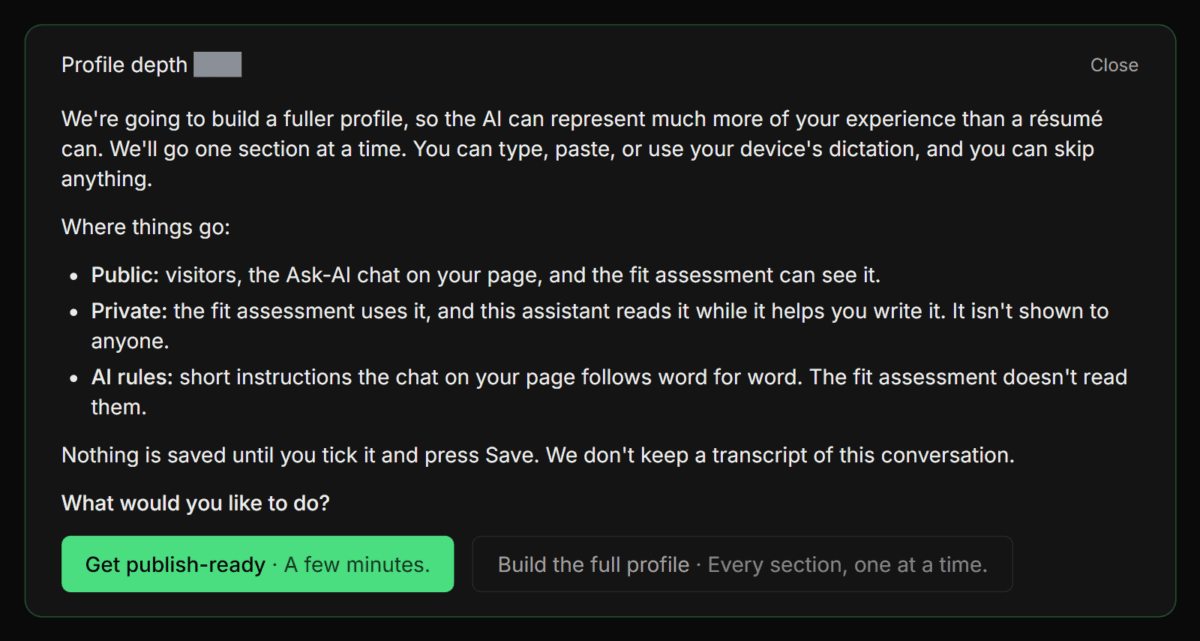
The first time, it asks what you would like to do: Get publish-ready ("A few minutes."), on every plan, or Build the full profile ("Every section, one at a time."), which is part of Pro.
- Each turn asks a question, then shows drafts from your answer, each with a tick box, a badge saying where it goes and its Before and After. Some drafts arrive already ticked. Nothing reaches your profile until you press Save, and only ticked drafts are saved.
- Private questions are marked. Before them the assistant shows a line such as "These next questions are private notes. They don’t appear on your profile or in the chat; the fit assessment reads them. Answer any you like and skip the rest." You can also choose "Skip for now" or "Prefer not to say".
- On Pro: the assistant can plan the private notes for your three most recent roles, and, while evidence uploads are on, you can attach evidence to an answer, such as screenshots of results. It reads the files with that answer only; the files are not kept.
How many turns you get is on the limits page. Filling your profile with help: the profile assistant covers every screen.
Step 7 — Watch your quality score
As you fill the tabs, a quality score from 0 to 100 builds. It is a fixed set of weights: Experience 25, Narrative 20, Skills 15, Basics, Gaps and Values 10 each, FAQ and AI Instructions 5 each. Portfolio is not scored.
The score number in the Profile Builder changes color with your progress. It stays gray while publishing is blocked, however high the number, then turns amber from 50 to 75 once every requirement passes, and green above 75. While you are still a draft in the amber band, the status bar adds a note, for example "Score 62% — profile may not sustain deep AI interrogation". You can still publish, but it is worth deepening first. Above 75 is the band worth aiming for: the point where a skeptical hiring manager’s third follow-up question still gets a real answer.
The most common reason a score stalls below 50: roles with no private context, which score nothing however complete their public half looks. How does the quality score work? gives the points for every field.
Step 8 — Publish your profile
Click Publishing checklist in the status bar, next to the Publish profile button. A panel headed "Publishing requirements" opens with six rows, each with a ✓ or a ✗ and a line saying what is missing:
| Requirement | Passes when |
|---|---|
| Experience depth | At least 1 role with a company name, a job title and 2 or more private fields |
| Skills breadth | At least 3 Strong skills and at least 1 skill marked "Still developing" |
| Professional narrative | Elevator pitch of at least 100 characters |
| Acknowledged gaps | At least 1 gap or weakness entry |
| Your name | Your full name filled in on the Basics tab |
| Minimum score | Quality score of 50% or above |

Until every row is ticked, the button is dimmed, and hovering over it shows "Complete all required sections to publish". The most common holdouts are the still-developing skill and the pitch length. A name made only of spaces counts as empty. Why won’t the Publish button enable? gives every row’s exact wording and how to clear it.
Click Publish profile. The button reads "Publishing…", then a banner confirms "Your profile is live. View it →" and the status dot reads Published. Publishing also lists you in the recruiter directory, and you receive an email titled "Your Profiled profile is live" with your public link. Nothing publishes by itself. If you are not sure it worked, see I clicked Publish and nothing seemed to happen — is my profile live?
Your public address is profiled.careers/ followed by your handle. It is shown at the top of the Basics tab, where Edit lets you change it. Your first handle comes from your email address; the first time your full name is saved, it is replaced with one based on your name. After a change, your old link redirects to the new one for 90 days, and you can change it again after 30 days.
What visitors see at that address: your status badge, photo, name, title, elevator pitch, company badges and links, with the Ask AI About Me button; your public experience bullets; your Strong, Moderate and Gaps & Growth Areas columns; the Honest Fit Assessment section; your FAQs; and a footer with "Build your own Profiled page" and "Powered by Profiled". The watermark is on every profile on every plan. Visitors never see anything marked private, and portfolio items are not shown yet. Inside the chat, a line reads "AI-powered by Profiled. Answers reflect the candidate’s self-reported profile and may contain mistakes." What exactly do visitors and recruiters see on my public profile? goes section by section.
Visiting your own live page. View your profile in the sidebar opens it in a new tab. While you are signed in, a slim bar at the top reads "You’re viewing your live profile", with a Back to dashboard link. Only you see it.
Before you publish, your address shows a "not found" page to everyone, you included. Preview in the sidebar is how you see your draft; Ask AI and the Honest Fit Assessment are switched off there. Preview / View your profile: your profile as a visitor sees it covers both views.
Changing your mind. The Unpublish button next to the status dot returns your profile to Draft and removes it from the recruiter directory. Nothing is deleted, and you can publish again at any time. See Can I unpublish my profile, and what happens when I do?
Step 9 — Check a Job Fit
Check a Job Fit in the sidebar runs the Honest Fit Assessment on your own profile, against a job you are thinking of applying for. The page is headed "How do you rate for this job?" and says: "Run the same Honest Fit Assessment recruiters use on your profile — your experience, skills and gaps, including your private notes — against a job you’re considering. Only you see the result."
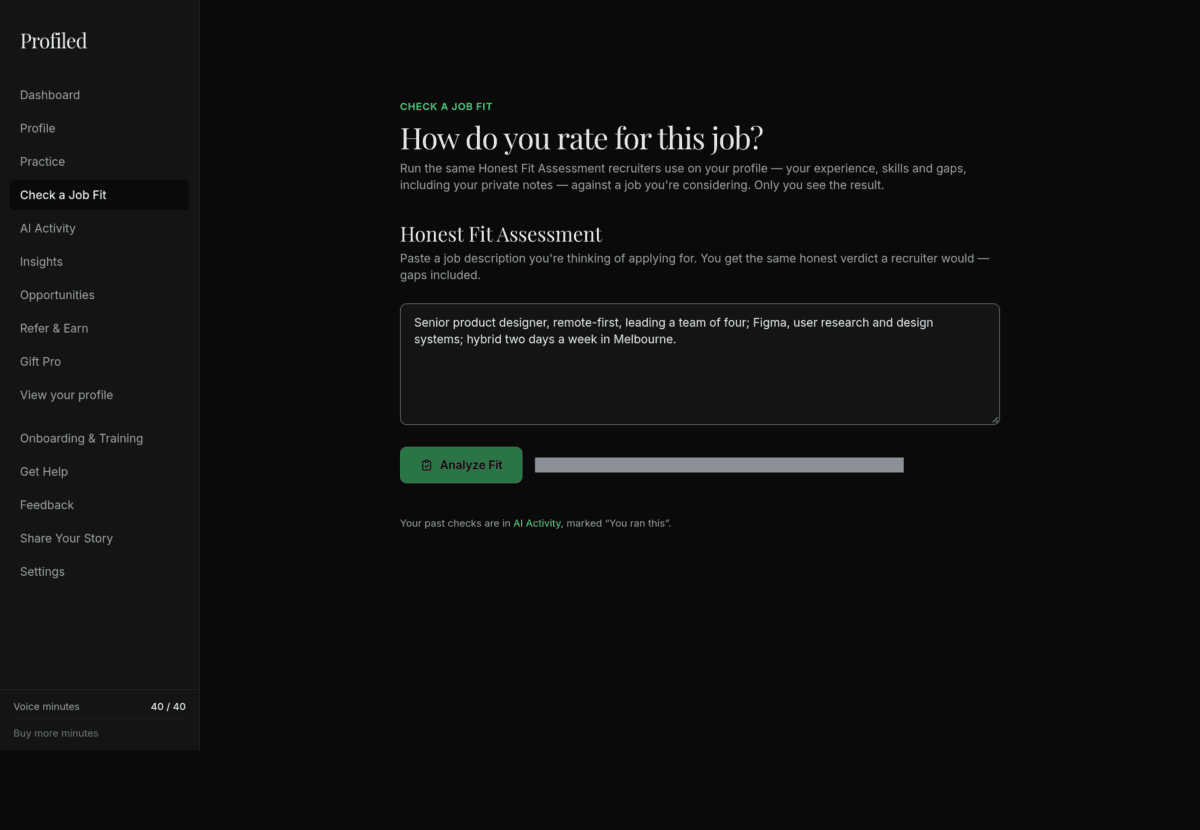
It works on a draft as well as a published profile, which makes it a good test before you go live. On a draft the page adds: "Your profile isn’t published yet, so this uses what you’ve written so far. A fuller profile gives a sharper verdict."
- Paste the full job description into the box. It needs at least 50 characters, and a counter shows how much room is left.
- Click Analyze Fit. The check usually takes 30–60 seconds.
- Read the result. A note above it says: "This is written to you. The verdict is the same one a recruiter would see for this job; the wording, and what to do next, is addressed to you." It opens with a verdict, "Strong fit", "Worth a conversation" or "Probably not your person", then a headline, your strengths, your gaps marked Major or Minor, transferable skills, a section headed "What to do next" and a confidence figure.
Practice for this role. On Pro, a check you have just run offers a mock interview built from it, just below "What to do next". The button depends on the verdict: "Practice for this role" for Strong fit, "Practice for this role — rehearse the gaps" for Worth a conversation, and "Rehearse how you’d address the gaps" for Probably not your person. On Free, the same place reads "Practice for this role is included in Pro". See Practice for this role: a mock interview built from a job fit check (Pro).
Your own checks use your profile’s fit allowance, the same allowance visitors draw on. A line under the button shows where you stand. On Free the allowance is capped; on Pro it is unlimited, with a per-connection limit. The figures are on the limits page.
Every check is saved in AI Activity, marked "You ran this". Use a weak verdict as a to-do list: the gaps it names usually point at a private field you have not filled or a strength you have not given evidence for. How does the fit assessment work, and what information does it see? explains what the assessment reads, and What do the fit verdict terms actually mean? explains the verdicts.
Step 10 — Your first week: test, share, deepen
Publishing is the midpoint, not the finish. The first week is when your profile starts earning its keep.
- Interrogate your own AI. Open your live page, click Ask AI About Me, and ask the three questions you would least like to be asked in an interview. Read the answers as a skeptical hiring manager would. The chat answers from your public profile only, so fix a thin answer with a FAQ, an AI instruction or more detail in your public fields. What does the AI chat on my public profile know about me? explains its sources.
- Run a real job through Check a Job Fit, and fix what the gaps section points at.
- Share your link. Nobody can assess a profile they haven’t found. Put your address in your LinkedIn profile, your email signature and every application. How do I share my profile link? shows where to copy it.
- Deepen. Fill in the remaining private fields on your top two roles, complete Values, write three FAQs and add an AI instruction or two. Aim for the band above 75.
- Watch AI Activity. It shows what visitors actually ask and the verdicts their assessments return. AI Activity: what visitors asked and how the AI answered explains each list. On Pro, Insights turns that activity into patterns: what keeps coming up as a gap, what visitors ask, and which publishing requirement is still open. See Candidate Insights (Pro).
- On Pro: run one practice interview, "For a role I’m applying for", "One interview stage" or "A 5-minute drill", and read the debrief with the Profile Builder open in another tab. Practice carries the note "Experimental. Practice interviews are new. The interviewer and the debrief are AI-generated, so treat the feedback as a rehearsal aid, not an assessment." See Voice interviews and practice (Pro), and How do voice minutes work, and what happens when I run out? for minutes.
Your first week on Profiled: build, publish, watch, fix turns this into a weekly and monthly routine.
Step 11 — Refer & Earn, and Gift Pro
You don’t have to pay for Pro. Refer & Earn is in the sidebar on every plan, including Free. The page is headed "Earn months of Pro by inviting people who’d use this."
- What you earn. Half a month of Pro when someone you invited publishes their profile within 14 days of signing up. When they upgrade to paid Pro, 2 more months, released after a 31-day refund-guarantee window.
- The reward bank shows Available, Pending, Held and Total. Only Available can be claimed. Rewards earned in your own first week are held and released automatically once your account is 7 days old.
- Sending. Up to 5 invitations per rolling 24 hours, with an optional personal message. The form shows how many you have left.
- During the closed beta, the people you invite join the priority list rather than signing up on the spot. Your credit is recorded the moment they click your link and holds until they are let in.
Refer & Earn — the free path to Pro (every tier) covers the screen, claiming and every status, and How do referral rewards work — what do I earn, and when is it released? covers the timing.
On Pro: Gift Pro. Each quarter you can give up to 5 people a 14-day Pro trial, with no card needed on their side. Unused gifts don’t carry over. If a recipient later pays for Pro, you earn a gift bonus of 1 month instead of the upgrade reward. Ask before you gift: a gift to someone who already has an account still uses one up. See Gift Pro (Pro).
Step 12 — What Pro adds, and do you need it
You can run a complete, published, AI-backed profile on Free for as long as you like. Pro adds depth and reach:
| Feature | Free | Pro |
|---|---|---|
| Profile builder, résumé or profile document import, publishing, public profile | Yes | Yes |
| The profile assistant (Fill it with help) | Up to publish-ready | The full interview, plus attaching evidence while uploads are on |
| Visitor AI chat on your profile | A monthly allowance | Unlimited |
| Fit assessments on your profile, including Check a Job Fit | An allowance every 30 days | Unlimited |
| AI Activity | Yes | Yes |
| Insights | Activity counts | The full patterns |
| Practice interviews with a debrief, including Practice for this role | No | Yes, with monthly voice minutes |
| Gift Pro | No | Yes |
| Opportunities, where switched on | Browse | Browse and apply |
| Refer & Earn | Yes | Yes |
The allowances and voice minutes are listed on the limits page, and plans and prices on the pricing page.
The honest recommendation: start on Free, publish, and test your own AI. Upgrade when you want the assistant’s full interview or practice interviews, when your profile is shared widely enough to reach its allowances, or when you want to apply through Opportunities. Refer & Earn can get you there without paying.
Three kinds of Pro. Pro can be paid, complimentary (given with an invitation or by the Profiled team, with an end date shown in the dashboard banner) or a reward grant claimed from Refer & Earn. All three give you the same features. A reward grant carries a smaller voice allowance and no top-ups. When complimentary or reward Pro ends, your account returns to Free: your profile stays published, nothing is deleted, and the Pro features lock. See What happens when my complimentary or reward Pro ends?
Upgrading. On Free, Settings shows an "Upgrade your plan" card with a monthly or annual choice. On complimentary or reward Pro, Settings shows when your access ends, and the dashboard banner’s See plans button opens the plans. Settings: your plan and subscription covers each case, and What exactly does Pro add, and what does it cost? has the full list.
Get Help when you’re stuck
Get Help in the sidebar is the support hub, on every plan. Before the first use it asks for your consent to AI support processing.
- Resources: Documentation, the Blog, and Onboarding & Training.
- AI Search gives one sourced answer to one question from Profiled’s documentation.
- Chat with Majik is a conversation with Profiled’s AI support assistant. Majik is not a human. Its answers cite their sources: numbered markers point to a "Sources" list. To reach a person, click Talk to a human at the top right of the chat. It works at any time, even before your first message, when it switches the message box to a message for the team: "Your message will go straight to the Profiled team — Majik won’t answer it."
- Create a ticket for a tracked thread. Majik replies first. If it can’t answer from the documentation, as happens when you write that you want a person, the ticket goes to the team and shows "With the team".
If you open a support page while signed out, you are sent to sign in and brought back to the same page. If you can’t sign in at all, use the public support form. Every route is in Get Help: AI Search, chat with Majik, and support tickets.
Common questions in the first week
- Is Free actually usable, or just a trial? Fully usable, with no end date. See Is Free a trial? What does it include?
- Do hiring managers see my private context? No. It is never shown on your page and never given to the visitor chat. It informs the Honest Fit Assessment, and the profile assistant reads it while it helps you write it, showing it only to you.
- Why won’t the Publish button enable? One of the six rows is unticked, most often the still-developing skill or a pitch under 100 characters. Open the Publishing checklist.
- The import added skills I don’t want. Untick them in the review before you click Apply to profile. Already applied? Merge or delete them on the Skills tab, fix categories and mark at least one skill "Still developing".
- My profile address doesn’t match my name. Your first handle comes from your email. Saving your full name replaces it once, and you can edit it on the Basics tab.
- I edited a field and it didn’t save. Click out of the field and wait for "Saved" before you leave. On most tabs a field saves when you leave it.
- Can I get help filling in my profile? Yes. "Fill it with help" on the Profile page gets you publish-ready on every plan; the full interview is part of Pro.
- Do my own fit checks use my allowance? Yes. Check a Job Fit draws on the same allowance as visitors to your profile; see the limits page.
- What happens when my complimentary Pro ends? Your account returns to Free and your profile stays published. Nothing is deleted.
- Can I remove the "Powered by Profiled" line? No. It is on every profile on every plan.
More answers, and a symptom table, are in Troubleshooting and first-week FAQ. A term you don’t recognize is probably in the Profiled glossary: the terms you will see across the product.
Finishing
- Your account is created and you know your way around the dashboard and sidebar
- Your résumé or profile document is imported and reviewed, or your roles are filled in with help or by hand
- Your full name, title, location, availability and remote preference are set
- At least one role has two or more private fields, and you have 3 Strong skills, 1 skill marked "Still developing", a 100-character pitch and at least one gap
- Your quality score is 50 or more, and you are working toward 75
- Your profile is published and you have opened it with View your profile
- You have run Check a Job Fit on a real job and asked your own AI three hard questions
- Your link is on your LinkedIn profile and in your email signature
Related
- Building your profile
- Your first week on Profiled: build, publish, watch, fix
- Earn Pro, gift Pro, practice and get help
Last verified: 2026-10-21